
Dialogic cards supported
The following Dialogic cards
have been tested to work with INS:
D/4PCI, D/4PCIU, D/4PCIUF, D/41E, D/41EPCI, D/41JCT, D/41ESC, D/41H, D/42 series, D/120JCT, D/160S, D/21H, ProLine/2V, D/21D, D/41D, Dialog/2, Dialog/4, all digital T1/E1 cards: D/240, D/480, D/300, D/600, and all DMV-series cards.
The D4PCI card is about US$500 brand new from a number of large online retailers (please see the Communication Devices page), and many cards can be purchased second-hand on Ebay for as little as $200 – just search for “Dialogic” on www.ebay.com
Installing Dialogic Software
Dialogic's System Release 5.1.1 SP1 (or later) software should be used with INS.
Dialogic System Release software can be downloaded
for free from:
http://membersresource.intel.com/_releases/winnt/SR511/SR511All.zip
When installing SR5.1.1 the "Custom Installation" option should be chosen and then the "Global API" option must be selected.
SR5.1.1 Service Pack 1 should be installed after SR5.1.1 is installed.
D/4PCIU & D/4PCIUF cards require either the
SR5.1.1 Feature Pack 1 drivers, or the
SR5.1.1 +
SR5.1.1 SP1 +
D4PCIU support patch.
Newest DMV cards require SR6.0 drivers.
The freely available
SR5.1.1 +
SR5.1.1 SP1 drivers are sufficient for
all other cards (even on WinXP systems).
If you can not find
those drivers on the Dialogic site you can find them on our web site below:
SR5.1.1 on
http://www.mawnet.com/download/SR511All.zip (300MB)
SR5.1.1 Feature Pack 1 on
http://www.mawnet.com/download/SR511FP1.zip
Please always refer to the Dialogic’s Release Notes and/or Installation Notes to determine what Operating System may be used.
If using Windows NT then Internet Explorer 5 or greater should also be installed. Please read the Dialogic cards release notes and help files to ensure correct installation and configuration of your Dialogic card - these will cover how to set up your card to correctly detect busy and engaged tones, and perform call transfers correctly.
Sometimes you will need to specify a particular “Parameter File” in the Dialogic’s Configuration Manager to ensure the card is set up to work correctly with phone lines in your country. Please consult your local Dialogic representative regarding any questions relating to configuration of your Dialogic card.
Installing PCI Dialogic Card
Dialogic PCI voice cards have a small rotary switch (on the circuit card), which sets the board number. If this is the first Dialogic voice card in the PC, set the board number to 1. Plug the Dialogic voice card into any available PCI slot on the PC mother board.
If the card is not detected, or the model is displayed as ????, do the following:
Installing ISA Dialogic Card
Dialogic ISA voice cards have jumper switches for setting the hardware interrupt level (IRQ) and base memory address segment. When fitting these Dialogic voice cards, it is essential to choose a hardware interrupt level and base memory address segment that do not conflict with existing equipment installed in your PC.
How to check for un-allocated IRQ and memory on
Windows NT:
From the Start menu, select Programs, then Administrative Tools, then Windows NT
Diagnostics.
Press the Resources tab.
Press the IRQ button to view currently allocated IRQs.
Press the Memory button to view currently allocated segments.
How to check for un-allocated IRQ and memory on
Windows 2000/XP:
From the Start menu, select Programs, then Accessories, then System Tools, then
System Information.
Expand the Hardware Resources folder.
Press the IRQs folder to view currently allocated IRQs.
Press the Memory folder to view currently allocated segments.
Having identified suitable free IRQ and memory address, configure the card by setting the jumpers and switches located on the card. IRQ 5 is usually a good choice, the base memory address can usually be left at the default D000.
Installing the TAPI driver
Please carry out the installation of Dialogic’s TAPI and Wave drivers as per the instructions below and then test your system using Dialogic’s TALKER32 application as outlined in the last part of this chapter.
When installing the Dialogic software select 'Custom Installation' option and ensure that the TAPI Drivers and the Global Call option is selected. Global Call needs to be installed in order for the TAPI Driver to be loaded.
Full instructions on installing the TAPI and Wave drivers can be found in the Dialogic help file “d41mt.hlp” located in Windows’ System32 directory.
After installing the Dialogic software you will need to configure the TAPI Driver and the Wave Driver.
After installing the Dialogic TAPI and Wave drivers you can test the system using the Dialogic demonstration application TALKER32. TALKER32 uses the TAPI/Wave interface to control the Dialogic card, which is the same control interface used by INS.
Boards D/21D, D/41D, Dialog/2,
Dialog/4 and VFX/40 can only support Mu-Law WAV files
under TAPI/Wave. You will need to download this set of INS system sound files if
you intend to use INS with those boards.
Installing Dialogic TAPI driver
Run Setup from the 'Dialogic System Software and SDK' CD. You will need to ensure that the TAPI drivers are installed as well.
1. Run the Telephony applet in the Control Panel:
2. Click the Advanced tab (or Telephony Drivers tab).
3. If the Dialogic Service Provider for NT does not appear in the Telephony Drivers tab, do the following to add it:
4. Click Detect Boards to update the list of Dialogic board channels (dxxxB1C1 is board 1 channel 1). The list is updated to match the configuration that was most recently started. You can click Help to access on-line help for the TSP configuration.
5. Click OK to close the Dialogic TSP Configuration dialog. The Dialogic TSP should now appear in the Telephony Drivers tab. Note that the Configure button can be used to redisplay the Dialogic TSP Configuration dialog.
6. Click OK (or Close) button to exit the Telephony applet.
After installation use the Dialogic Configuration Manager to configure and start the board.
Installing Dialogic Wave driver - Windows XP/2000/2003 :
See here for step-by-step guide with screenshots.
The “Dialogic WAVE driver 1.X” should now be seen in the Device Manager (Control
Panel
->
System
->
Hardware Tab
->
Device Manager).
The “No drivers are installed for this device” message in the “Device Status” box
is normal. Once “Dialogic WAVE Driver” is listed in Device Managers “Sound, video
and game controllers” section then this indicates that the
Wave drivers are working.
If the “Dialogic WAVE Driver” entry has an exclamation mark next to it then this indicates that the Wave drivers are not correctly installed and that they should be uninstalled and re-installed again.
The remainder of the recommended configuration for the Wave drivers is shown below:
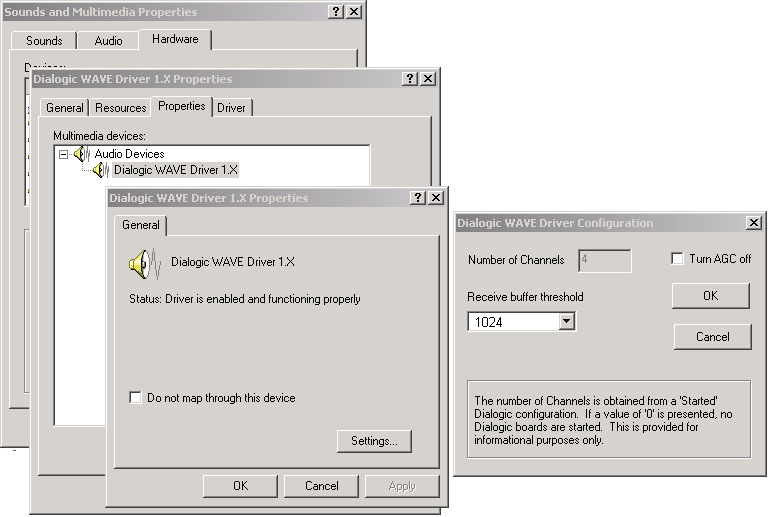
If the sound quality sounds bad (discontinued speech, delays, ...) you may need to adjust the following property setting of the WAVE driver:

Wave driver problem solving (reinstallation)
Sometimes installing 3rd party Sound Recording software or other changes to wave driver configuration results in the Dialogic (or voice modem) wave drivers being re-mapped incorrectly, resulting in the sound files from the running script being played through the computer's speakers, or "WAVERR_BADFORMAT" errors returned when trying to play sound files (even when the preferred format sound files are used: for Dialogic: PCM 11025Hz, 8bit, Mono and for Voice modem: PCM 8000Hz, 16bit, Mono).
In these situations the Dialogic (or voice modem) wave drivers should be uninstalled and the re-installed again in order to have them play the sound files correctly. The computer must be rebooted after the driver uninstall and then again rebooted after driver re-install. It is a good idea to uninstall all wave drivers and install just the Dialogic/Modem wave driver first. If that works then other Wave drivers (sound card etc) may be added.
To uninstall the wave driver:
1. Run the Control Panel
Sounds and Multimedia applet.
2. Click the Hardware tab.
3. Select Audio for Dialogic WAVE Driver (or the "Unimodem Half-Duplex Audio Device"
if using voice modem).
4. Click Properties.
5. Select "Driver" tab.
6. Click Uninstall.
7. Reboot computer before re-installing driver.
Test using Dialogic’s TALKER32
Once the TAPI and Wave drivers
have been installed and the Dialogic service is running you can test the Dialogic
card using Dialogic’s own TALKER32 Demo/Testing Application. TALKER32 can be found
by following:
Start
->
Programs
->
Dialogic System Software
->
Dialogic Sample Programs
->
TAPI
When you start TALKER32
it will find all TAPI devices on the system – amongst them the Dialogic lines should
be listed. You can find out which are the Dialogic lines by pressing the “Info”
button and looking at the description on the Line Information dialog – for Dialogic
lines it will say “Line type: Dialogic Gen 2”

Find all the Dialogic lines
and select the “Auto Answer” and “Auto Play” check boxes, and also for each Dialogic
line click the “Select file to play” and indicate the sound file “play.wav”
from the TALKER32’s directory (\Program Files\Dialogic\Samples\Talker32\play.wav)
should be used.
When you now call into the
system TALKER32 will answer the call and play “Welcome to Dialogic…”
If the caller has heard that sound file being played then the system is now ready to be used with INS.
Configure Dialogic TSP
Dialogic TSP (Telephony Service Provider) can be accessed using:
Win98/NT: Open Control Panel’s Telephony applet, select the Telephony Drivers tab, select the Dialogic Service Provider and the press Configure.
Win2000/XP: Open Control Panel’s “Phone and Modem Options” applet, select the Advanced tab, select the Dialogic Service Provider and then click Configure:

Dialogic TSP Configuration allows setting of the
the number of rings after which the call should be
reported, definition
of disconnect/busy tones which are used by your telephone network, and the commands
used by the PBX to transfer calls correctly. There is also a "PABX Wizard" that
allows you to let the Dialogic card detect the different signals by itself.
Please note that there is unfortunately no plug-and-play with the Dialogic cards
and it needs quite some playing around with the settings and the voice files to
get a good sound quality on the played voice files.
Voice File Format supported
When using Dialogic TAPI drivers all
sound files must be in format: CCITT u-LAW 11kHZ, 8 bit, Mono. That is the
only format which the Dialogic TAPI driver accepts.
To convert the files you may have recorded before (and also the files in the
C:\INS\assorted directory), you may use the windows Sndrec32.exe or a similar
tool.
(Here you can
download the Assorted files in the correct format)
Be especially aware that the
Dialogc cards do not accept any noise recorded with the voice files. Noise while
recording your voice files makes the final playback quality unbearable bad.
Therefore always use a software to filter any noise after recording.
Found New Hardware Wizard on Win2000
If the Found New Hardware Wizard keeps popping
up every time you start Windows, and you are unable to stop it by pressing Cancel
please read:
http://resource.intel.com/telecom/support/tnotes/tnbyos/winnt/tn383.htm => broken link: Please search the Intel web site.